
Installing the Swivl Widgets on Your WordPress Site
Add 24/7 online booking, instant quotes, AI chat & analytics to your WordPress site. Three install methods, exact code, testing checklist & troubleshooting.
Overview
This guide walks you through adding the four Swivl widgets that are Online Booking, Instant Quote, Chat, and Analytics to your WordPress website. No design changes are needed; the widgets sit on top of your existing site.
What each widget does
- Scheduler / Booking: Customers book service appointments online 24/7. Bookings flow straight to your Swivl dashboard.
- Instant Quote: Gives visitors an on-the-spot estimate for common jobs, capturing leads even outside business hours.
- Chat: An AI chatbot that answers questions, qualifies leads, and hands off to booking. An always-on front desk.
- Analytics: A lightweight, invisible tracking script that measures widget and page performance in Swivl.
Each widget is a single <script> tag with the defer attribute, so it loads after your page content and won't hurt page speed.
Before you begin
- Admin access: Sign in to your WordPress dashboard (yourwebsite.com/wp-admin) with an Administrator account.
- Your account key: Every script tag uses the same key (it appears as
data-hash="..."). Find yours in your Swivl dashboard and replaceYOUR_ACCOUNT_KEYin the code with it. - Back up first: Take a backup or use a staging copy before editing anything.
- Add widgets one at a time and check the site after each, so you know exactly which one caused any issue.
Choose an installation method
Method | Best for | Where widgets appear | Difficulty |
A: Code-snippet plugin (WPCode) | Site owner / non-technical | Every page | Easiest |
B: Theme header | Developer | Every page | Medium |
C: Block / page embed | Either | One specific page | Easy |
Recommendation: Use Method A for Chat and Analytics (they should run site-wide). Optionally use Method C to place the Scheduler and Instant Quote on dedicated "Book Now" or "Get a Quote" pages.
Method A: Code-snippet plugin (Recommended)
- In WordPress admin, go to Plugins → Add New, search for "WPCode: Insert Headers and Footers", click Install Now, then Activate.
- Go to Code Snippets → + Add Snippet → "Add Your Custom Code (New Snippet)".
- Title it
Swivl Widgetsand set Code Type to HTML Snippet. - Paste the four script tags from "The exact code to paste" below.
- Under Insertion, choose Auto Insert → Site Wide Header.
- Toggle the snippet to Active and click Save Snippet.
- Open your website in a new tab the chat button should appear within a few seconds.
Alternative Plugins
Any "headers and footers" plugin works the same way (e.g., Insert Headers and Footers by WPBeginner, Header Footer Code Manager).
Method B: Theme header (Developer)
Use a child theme edits to the parent theme's header.php are wiped on theme updates.
- Go to Appearance → Theme File Editor (or edit via SFTP).
- Open header.php in the child theme.
- Paste the four script tags immediately before the closing
</head>tag. - Save and reload the live site.
Cleaner option: enqueue via functions.php instead of hardcoding them into header.php (see Technical Appendix).
Method C: Single page /Block embed
Use this when you want a widget on one specific page rather than everywhere
Option 1: Custom HTML block (Gutenberg editor)
- Edit the page where you want the widget (e.g. Pages → Book Now → Edit).
- Click the + to add a block and choose Custom HTML.
- Paste the specific script tag for that widget (from Section 7) into the block.
- Click Update to publish. The widget now loads only on that page.
Option 2: Hosted links (zero code)
Link a button or menu item directly to Swivl's hosted pages:

Quick win: Add a "Book Now" menu item (Appearance → Menus → Custom Link) pointing at the scheduler URL.Customers can book without you touching a single line of code.
The exact code to paste
Use all four together for a site-wide install, or copy just the one you need for a single page. Replace YOUR_ACCOUNT_KEY with the key from your Swivl dashboard all four tags share the same value; that's expected.
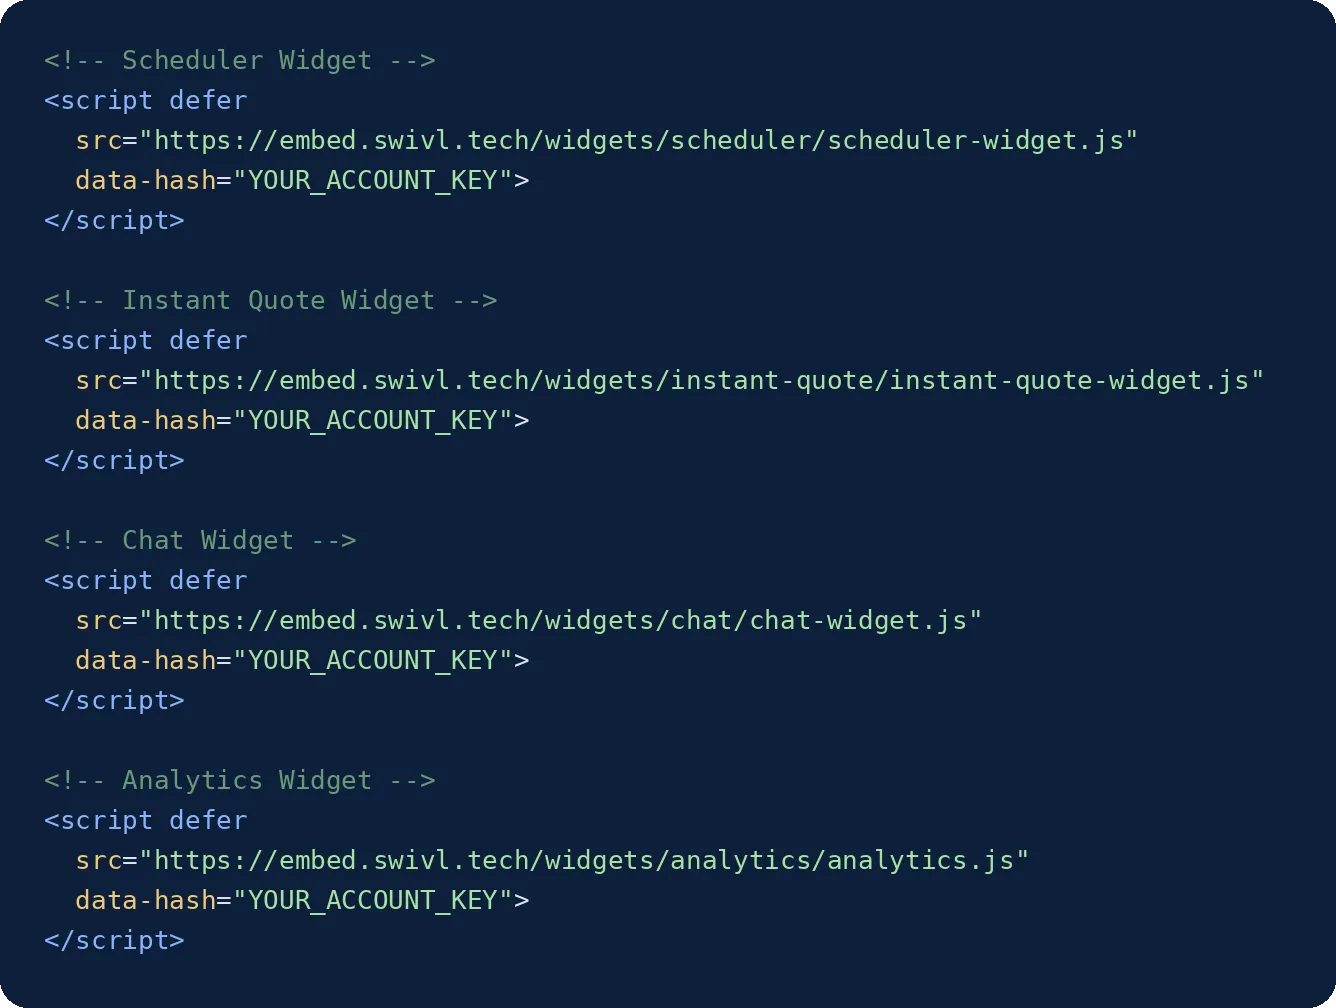
Note: All four tags share the same data-hash that's expected. It identifies your Swivl account across every widget.
Placement tips
- Scheduler: floating site-wide button plus a dedicated "Book Online" page linked from your menu and Google Business Profile.
- Instant Quote: best on a "Get a Free Quote" or "Services" page; it captures the lead even if the visitor doesn't finish.
- Chat: run site-wide; button appears bottom-right. Remove any older chat tool to avoid overlapping buttons.
- Analytics: install site-wide and first, so it measures everything from the start. It has no visible element.
Testing checklist
- Chat button appears on the homepage and opens when clicked
- Booking widget steps through choosing a service and time
- Instant Quote returns an estimate
- A test booking lands in your Swivl dashboard
- Mobile: widgets are readable and don't cover key buttons
- Page speed loads normally
- Analytics data appears in Swivl within a day
Developer tip: open the browser console (F12) and confirm the four embed.swivl.tech scripts load with a 200 status and no errors.
Troubleshooting
Symptom | Likely cause & fix |
Widgets don't appear | Snippets not active or in the wrong location then confirm Site Wide Header is selected in WPCode; clear caches and hard-refresh. |
Works in preview, not live | Caching/optimization plugin serving an old page purge cache; exclude embed.swivl.tech from JS minification. |
Two chat buttons | If the old chat widget is still installed then remove it. |
Widget shows an error | data-hash pasted incorrectly check for missing characters or line breaks. |
Scripts blocked in console | Security/CSP plugin blocking third-party scripts allow-list embed.swivl.tech. |
Changes vanished after theme update | Code was in the parent theme then move to a child theme or use Method A. |
Technical appendix functions.php enqueue
For developers, the cleanest approach. Add to the child theme's functions.php:
For developers, the cleanest approach. Add to the child theme's functions.php (replace YOUR_ACCOUNT_KEY with your key):
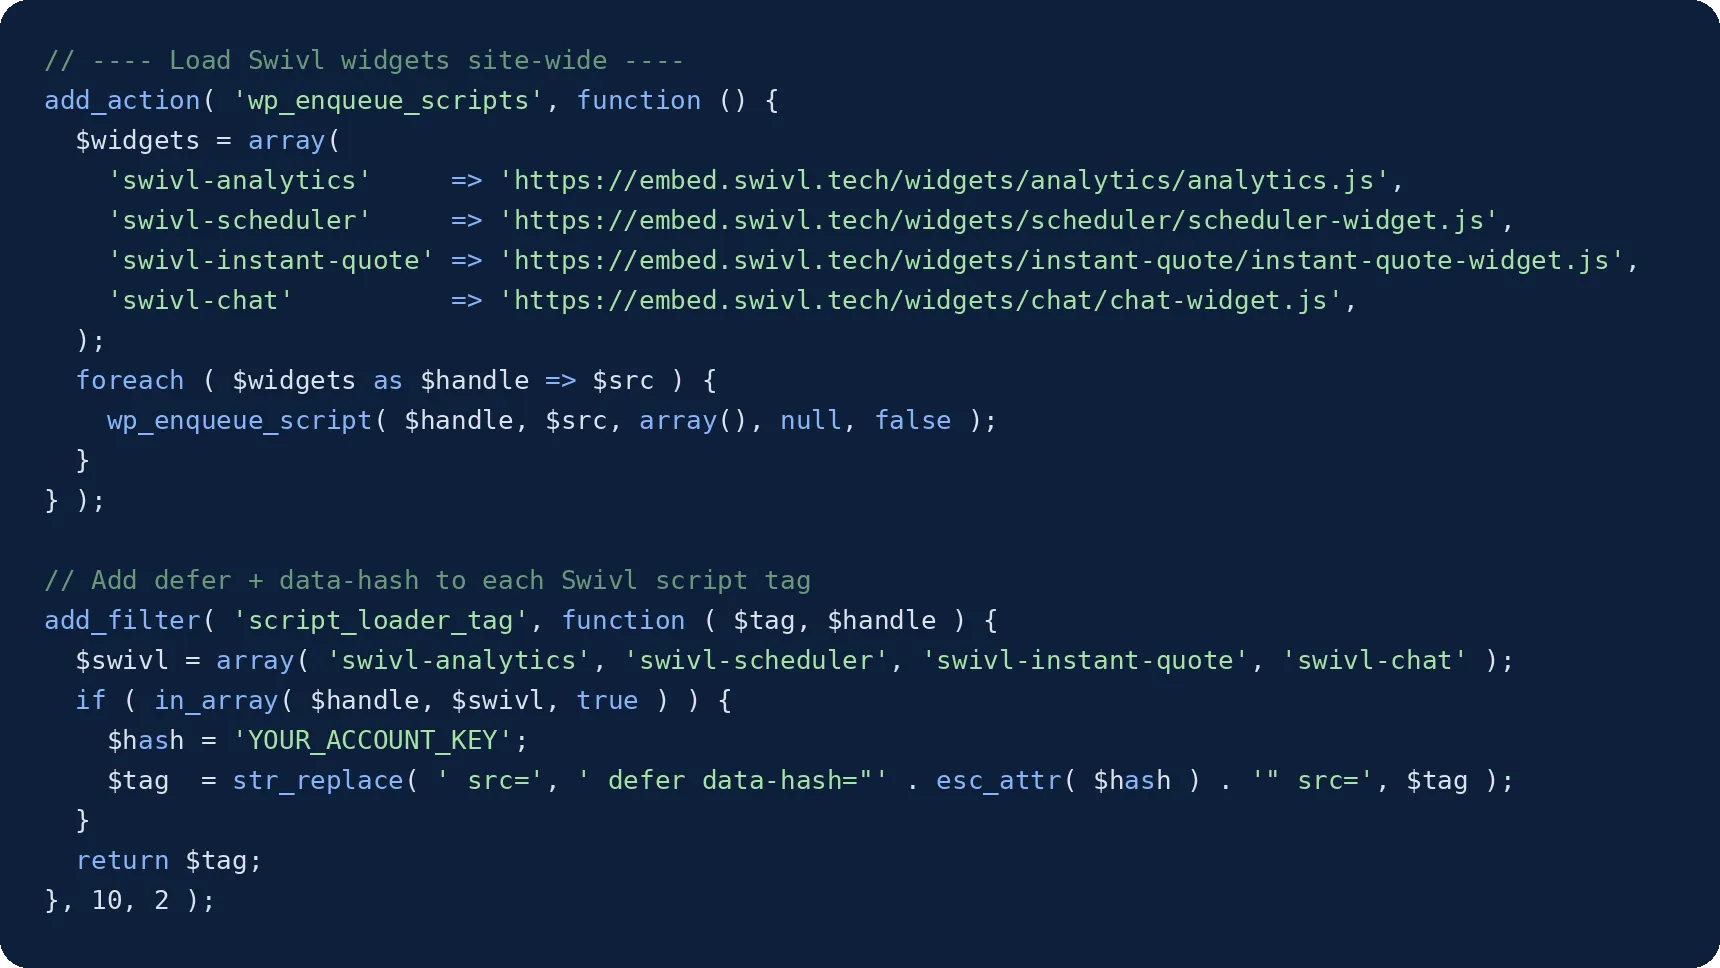
Why this way:
Enqueuing survives theme edits, keeps the header clean, and lets you conditionally load a widget on specific templates later (e.g., wrap the scheduler enqueue in if ( is_page( 'book' ) ).
Wrapping up
That's everything you need to get the Swivl widgets live on your website. The fastest path: install WPCode, paste the four script tags into a site-wide header snippet, and activate. Within minutes, customers can chat, get instant quotes, and book appointments 24/7, while Analytics tracks performance in your Swivl dashboard. Back up before you start, add widgets one at a time, and run through the testing checklist when done.
Ready to go live?
Log in to your WordPress dashboard and install the widgets today, most site owners finish in under 15 minutes. Prefer a hands-off option? Just link your "Book Now" menu button to your hosted scheduler page and start taking bookings with zero code.
Questions or stuck on a step? Reach out to the Swivl support team we're happy to walk you through the install or do it with you.